So last week I touched on a popular cake trend which was naked cakes, this week it’s the DRIP CAKE! Everything you ever wanted to know will hopefully be highlighted in this blog and if it isn’t comment below and let me know! Let’s get started, shall we?! So the original drip cake, to my knowledge was created by the amazing Katherine Sabbath! Her tall sky scraping style cakes with fun and funky bright colours and decadent ice cream melting drips have taken over the nation! This style is so versatile and can be suited to almost any theme! Some more than others, some of my favourite themes that I think a drip cake goes perfectly with are:
- Ice cream theme
- Candy land
- GAME OF THRONES! Yes, I mean a bloody drip…
- HALLOWEEN! Yep more blood…
- And many more!
But of course any theme and crazy colours and candies are just as good if not better! Drips are predominantly made using a ganache (1:1 ratio of chocolate and cream), the amount of ganache needed will vary according to how big (wide and tall) your cake is, how many tiers you have etc. I would recommend using a small amount and not an entire batch of ganache. You can even use royal icing and use at a semi runny consistency (15 second icing). Here are a few issues you may run into:
- Your drip didn’t DRIP. You added the drip on and it was too thick, you tried to spread it but it’s a BIG mess!
- Your ganache was too runny, it ran right down the cake and the drips didn’t have variation in height across the cake
- Your buttercream wasn’t smooth to begin with and lacked sharp edges so your drip didn’t “sit right”
- You coloured your chocolate and it seized
- You added water, milk, butter, oil to the chocolate INSTEAD of cream…
- The ganache was too hot when added (resulting in a melted mess)
- The ganache was too cold when added (resulting in thickness)
- You used liquid food colouring and it seized
- Using chocolate or candy melts without cream
- You added the ganache to your cake but your cake had been in the freezer and now the ganache is running down the cake and not sticking
Here are a few of my tips that I’ve picked up along the way that will help you get started!
To achieve the perfect drip cake you need to start with a perfect foundation, what I mean is make sure your cake is covered and iced evenly, smoothly and free of bumps and ridges. Here is one of my favourite handy tricks to achieving this… It’s no secret but the LID METHOD!
For example, if you have an 8-inch cake use an 8-inch board on the bottom of your first layer and use an additional 8-inch board on top of your last layer so you have two boards on the bottom and top of your cake. firstly you should trim down the sides of your cakes using a serrated edge knife and make sure you leave a small gap between your cake layers and the bottom 8-inch board (this little gap is filled with buttercream so we don’t see your cake layers coming through).
- Cover the top board in a product called “go-between” or you can even use cling wrap. Make sur you securely attach this to the board without any spaces or gaps or it won’t work.
- I would secure the bottom board to the cake with a layer of buttercream and also add a layer of buttercream to the top board and flip it over to meet your cake.
- Place your hand firmly but gently on top of the cake and apply your buttercream GENEROUSLY, (you’ll scrape this off later).
- Now the fun part, grab a scraper of your choice that is as high as your cake (if it is not as high don’t worry you’ll just have to even it out as you go), if you cant find any decently priced scrapers head on over to Bunnings! My first scraper was from there, works a treat!
- Once you have completely scraped your buttercream back until your scraper meets the with the top and bottom board, pop it into the fridge to set completely. You should be able to touch the cake gently without any buttercream marks.
Note: Always make sure your cake is properly chilled to the touch, DO NOT FREEZE THEM! The drip will attach too quickly and won’t get to drip naturally. If your cake comes out of the fridge and it’s got little moisture bubbles, be cautious as the ganache drips it will start to try escape the cake and fall off, I am not sure why I’m assuming the moisture of the cake and ganache are just not friends. You can try pat it down with a paper towel to remove the excess moisture. It shouldn’t happen to you but if it does don’t panic just let it sit for 5 minutes it will be ok.
These are the best things to use for a drip:
- Ganache (1:1 ratio of cream and chocolate), your consistency should be the same as pouring custard but a TAD thicker. Remember you can always adjust your ganache with a little warm cream. You also don’t want the ganache to be too runny or else it will just run down the cake and be a messy translucent mess.
- Royal icing
- Caramel! Although, you can’t colour it or paint it. My top tip for using caramel especially If you don’t want it to completely fall over the cake and lose its “drip” look, add some white chocolate into it or milk chocolate to thicken it up a little bit, it will give it a bit more body.
Best cakes and fillings to use for a drip cake:
- Anything! As long as it is a sturdy and delicious filling you should use it! although if you are using a soft filling I would recommend adding a thick buttercream layer as a dam to prevent seeping (use a round piping tip for this step).
- You can use sponge cakes however keep in mind they will be softer than a mud cake and will dry out quicker.
- In my opinion, mud cakes are easier to use as they are sturdy and stable but both will work! You can opt for a vanilla mud cake or a vanilla cake.
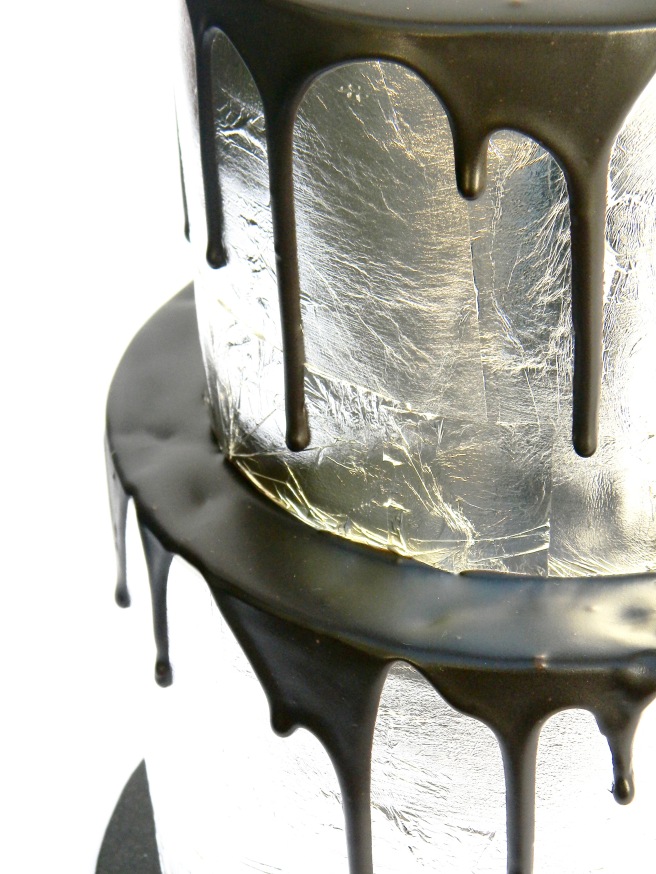
Remember, you can always use ganache to cover your cakes, you don’t have to use buttercream. You can even use fondant if you wanted to add a drip. Here is a cake I made using fondant covered in edible silver leaf and a black dark chocolate ganache drip.
Colouring your drip:
- It is best to use candy colours or any OIL based colours, these are really compatible with chocolate and won’t leave behind speckles or granules in your chocolate
- Gel colours are great to use, however they may sometimes leave a speckled look behind
- Powdered colours! I have used powder petal dust in a fuchsia pink to achieve a bubble-gum pink colour. However, I added it to the COLD chocolate and cream, mixed it all up in a bowl and added it into the microwave 30 seconds at a time. The colour was so vibrant!
- To achieve a baby pink, you can use powders or gels but you may be left with a translucent colour that looks watered down, add a bit of white gel colouring or titanium powder to give it a more pastel feel.
- To achieve a bright white drip, I recommend titanium powder first and then you can also try adding white food gel colouring.
- If you wanted to achieve a black drip, definitely use dark chocolate and use black colouring (see above image).


Painting your drip
- If you wanted to paint your drip gold, silver or copper I recommend chilling your cake and allowing your drip to set, before you paint.
- Use a mixture of rose spirit and lustre dust and make sure it isn’t too runny or too thick.
- Paint it on using a brush that is not as wide as your drip as you want to ensure It doesn’t smear on to the cake
Applying the drip
- I often use a teaspoon to control the drip, use a small amount at a time depending on where you want your drip to go and then add it to the top of the cake and push it over the side gently controlling how far down the drip will go. I then add a thin layer of ganache to the top of my cake and smooth it out quickly and gently using an offset palette knife. You usually don’t see much of the top if you are adding décor to it.
- You can also just pour about ½ a cup of ganache into the centre of your cake, smear it over with a spatula and hope that the drip cake gods give you a pretty drip all the way around (this is a bit unpredictable but it works too)
- You can use a squeeze bottle used for sauces and can be found in majority of dollar stores, this is a great and easy method!
- A disposable piping bag also works wonders if you want to control your drip
Note: I wouldn’t place my drips too closely together, space them out a little bit, if you want longer drips add more ganache, if you want shorter drips only use minimal amounts. It’s all about control with these babies!
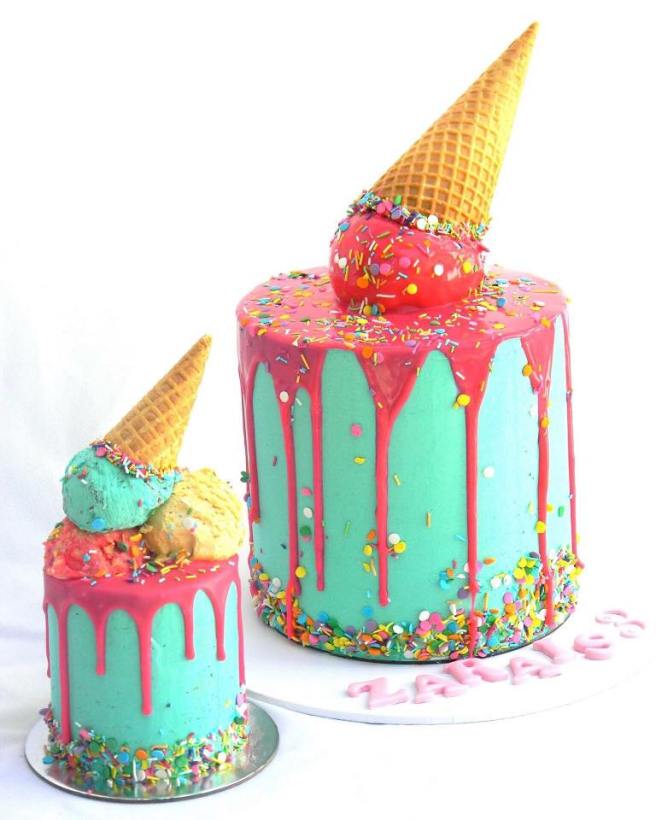
My top tips for achieving a melted ice cream look:
- Firstly, add your cake pop mix to an ice cream cone and attach it using chocolate to ensure it won’t fall off.
- Now, you can do this two ways, the first would be to add your drip to your cake and then add your cake pop ice cream cone to the cake (un-ganached) and add ganache over the top of it.
- Or you can add your drip to your cake and then dip your cake pop ice cream cone into ganache and apply it to the cake (this is how I do it).

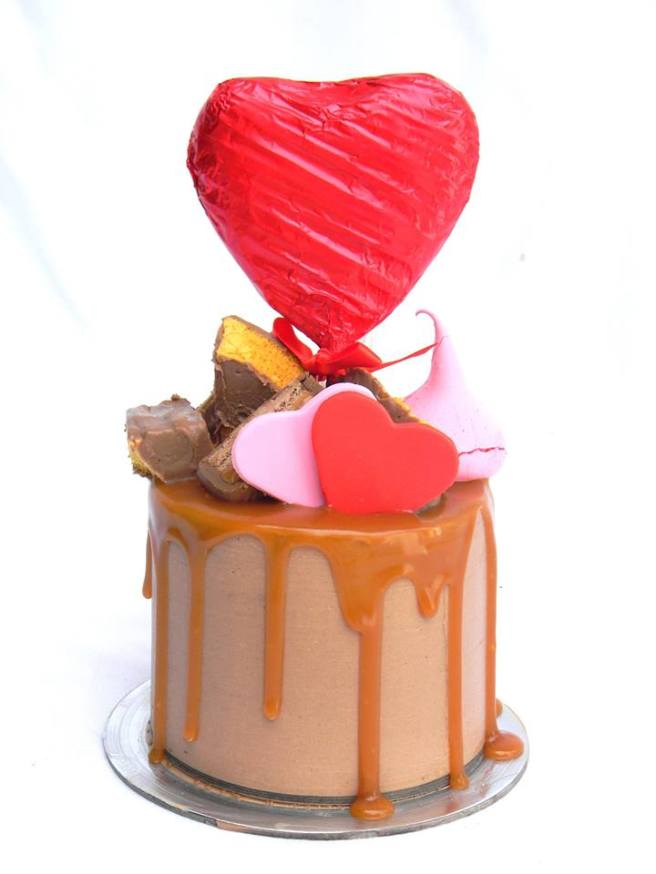
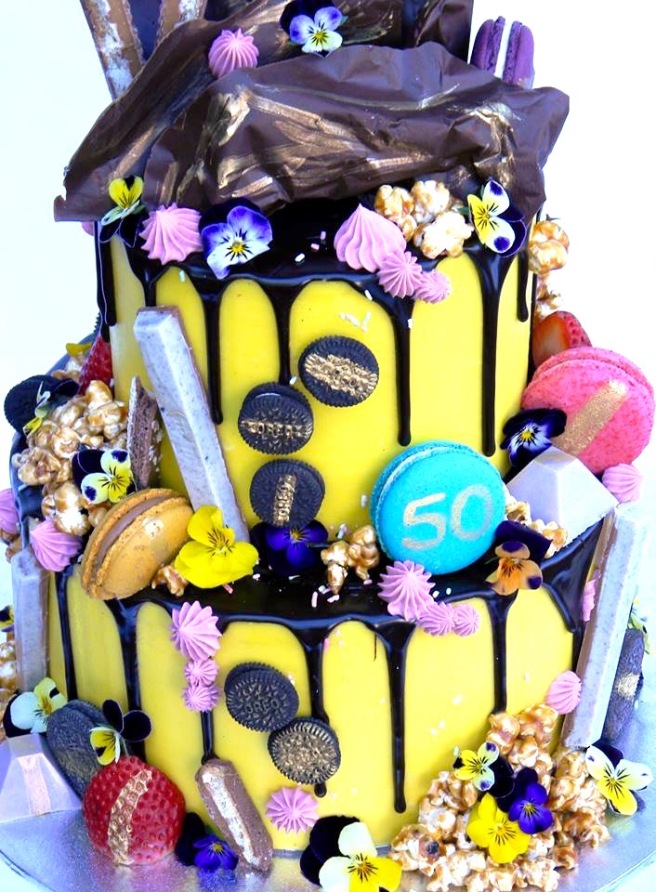
And here is my ultimate favourite drip cake inspired by Un-birthday bakery! This was actually my first drip cake I had ever made and so I was proud of it and enjoyed making this so much! I loved the contrast of the dark chocolate ganache drip and sunshine yellow buttercream. The bright colours of this cake were just beautiful, you can’t go wrong!
Get DRIPPING! Oh and listen to this song while you’re making one 😉
Love Nelle, xox

hi, do the fodant cakes have to be cold to do the drips? and if yes does condensation when the cake is brought out of the fridge affect the drip? Thanks
LikeLike
Hi Fay! No your fondant cake doesn’t have to be cold for you to apply your drip. Just ensure your fondant is dry and firm. Good luck!
LikeLike
Do I place the BC cake back in the fridge after I applied the ganache drip or can I let it set at room temperature? Also, will the drip melt while being transported?
LikeLike
Hi Valerie, I usually apply the drip and put it back in the fridge to set. I never let my buttercream set at room temp especially in summer. The drip shouldn’t melt while transporting if it has been properly chilled and you have air con in the car 🙂
LikeLike
Hey 🙂
How do you go about applying the drip to the bottom layer of a 2 tier cake? I’m thinking of doing a 6 inch and 8inch stack – would that work height wise for a drip cake?
Also, how do you apply the scattered sprinkles?
TIA!
LikeLike
Hi Vicki!
I apply my drip with a tea spoon, even if I have a two tier cake and am applying the drip to the bottom tier along the top edge I still use a tea spoon and just carefully apply it. I think that height would work perfectly 🙂 I apply the scattered sprinkles once the cake is cool and just either with the palm of my hand and have the cake over a bowl if I’m doing a sprinkle border. If I’m just scattering sprinkles I literally throw it on. Lots to clean after but it’s worth it hehe xx
LikeLike
Hi! Thanks for the read. Can I freeze a ganache drip cake? Thanks
LikeLike
Hey Laura!
I believe you can freeze a ganache drip cake, however I would be worried about ruining the drip itself. Maybe freeze your cake without the drip, wrap it after you’ve frozen the icing on the outside using cling wrap and foil then apply the drip once thawed out. Xx
LikeLike
Hi 🙂
If I painted the white ganache drip in gold, can I then store the cake overnight in the fridge? Or would it get ruined? It is a buttercream-covered cake. How else could it be stored?
Thanks in advance!
LikeLike
Yes you can store your buttercream cake in the fridge overnight 🙂
LikeLike
Perfect! Thank you so much!!
LikeLike
Excellent blog, can you please give the recipe for the white chocolate ganache for a drip cake using candy wafers? Thanks!
Carla
LikeLike
Hi there! I only use nestle melts so I’m not too sure but I would stick to the same ratios with candy melts, they can be thicker than whites chocolate so maybe a little bit more cream? It’s all trial and error
LikeLike
i want to do a drip cake but the ganache on to a fondant iced not buttercreamed, can it be put in the fridge after i’ve applied the dripped ganache??? i dont normally do drip cakes but its what my cousin wants for her baby shower cake…. i’ll be using a bottle to apply it so i have more control.
any hints or tips will be greatly appriciated
LikeLike
Hi there!
I don’t usually apply a “ganache” drip to my fondant cakes. If I was going to I would still leave my fondant cake out of the fridge and at room temperature. I would ensure my ganache was made using the stove top method (boiled cream over chocolate) and at a decent consistency (test it on the bench or on a cake scraper) x
LikeLike